alstang1
Supporting Member
- Joined
- Jul 30, 2004
- Messages
- 473
- Reaction score
- 171


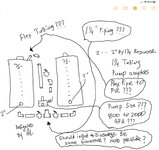
That is one heck of a nice build. Better than most out there. What size plumbing did you end up using?Just my two cents and answer some of your questions......added some photos of my build.
1. Determine what pump you are going to use and base that off your pipe size. Less reducers and fittings you have to deal with.
2. Pump size - I use an Iwaki MD-55RLT (Amount 1,200gph). 800gph is more than enough. Add pump onto a smart switch and have it on a timer to mix saltwater periodically.
3. Unions, unions, unions. It'll help breaking things apart to clean or to make future changes.
4. Use a uniseal for the connection to top of tanks and just hard plumb it. The PVC and be left long and go into the tank a few inches. Again, this is where unions come in handy.
5. You could do one control valve in the center, or put one on each end so you have a place for strictly RODI and salt water.
6. Don't cheap out on ball valves. Buy the Cepex brand and thank yourself later.
Other things I added:
-Clear PVC as a sight level gauge
-8" screw lid on top of SW tub
-Ball valve on riser to add a future hose output
-Float switch in RODI tub
-Heater in SW tub
-Built wooden stand to dispense directly into 5g jugs


Thanks! I ended up using 1” plumbing throughout. The tubs were given to me free from our local water company (they’re actually water softener tanks).That is one heck of a nice build. Better than most out there. What size plumbing did you end up using?
If I ever built one…it would be very close to your build. Love the gauges on this sides.
I’d say 1 inch plumbing is the most common.Thanks! I ended up using 1” plumbing throughout. The tubs were given to me free from our local water company (they’re actually water softener tanks).
Little old school touch with the sight levels lol I want to get some numbers printed to put on the clear pvc.
what’s your thoughts on “skinning” the wood? I stained and put a coat of poly on there.
Let me know if you ever want to build one, I think I still have my build sheet with all the cost and parts.
It looks good either way! I just think being able to see the individual boards takes away from the visual appeal. If you skinned it, routed the edges, and painted it would be super clean!what’s your thoughts on “skinning” the wood? I stained and put a coat of poly on there.
For the salt water stirring, you use the iwaki pump to cycle from the bottom up through the top. When making a new batch I’ll run the Iwaki pump for a day or two straight. Then every day for 30mins the smart switch will kick it on. I also have a power head at the bottom of the tank that runs 24/7 keeping any sediment from settling.I’d say 1 inch plumbing is the most common.
Yeah it looks nice and I’ll definitely keep you in mind If I build one.
Any pics of your output plumbing that stirs the salt/water.?
Thank you for the extra effort. It really helped my design. Went w 800 gph. I have everything arriving Monday except the unions. Guess I’ll look at Home Depot since I’m in Htown today.Just my two cents and answer some of your questions......added some photos of my build.
1. Determine what pump you are going to use and base that off your pipe size. Less reducers and fittings you have to deal with.
2. Pump size - I use an Iwaki MD-55RLT (Amount 1,200gph). 800gph is more than enough. Add pump onto a smart switch and have it on a timer to mix saltwater periodically.
3. Unions, unions, unions. It'll help breaking things apart to clean or to make future changes.
4. Use a uniseal for the connection to top of tanks and just hard plumb it. The PVC and be left long and go into the tank a few inches. Again, this is where unions come in handy.
5. You could do one control valve in the center, or put one on each end so you have a place for strictly RODI and salt water.
6. Don't cheap out on ball valves. Buy the Cepex brand and thank yourself later.
Other things I added:
-Clear PVC as a sight level gauge
-8" screw lid on top of SW tub
-Ball valve on riser to add a future hose output
-Float switch in RODI tub
-Heater in SW tub
-Built wooden stand to dispense directly into 5g jugs
How in the world does one primer pvc without ruining the appearance with those dreadful purple bleeding stains?Just my two cents and answer some of your questions......added some photos of my build.
1. Determine what pump you are going to use and base that off your pipe size. Less reducers and fittings you have to deal with.
2. Pump size - I use an Iwaki MD-55RLT (Amount 1,200gph). 800gph is more than enough. Add pump onto a smart switch and have it on a timer to mix saltwater periodically.
3. Unions, unions, unions. It'll help breaking things apart to clean or to make future changes.
4. Use a uniseal for the connection to top of tanks and just hard plumb it. The PVC and be left long and go into the tank a few inches. Again, this is where unions come in handy.
5. You could do one control valve in the center, or put one on each end so you have a place for strictly RODI and salt water.
6. Don't cheap out on ball valves. Buy the Cepex brand and thank yourself later.
Other things I added:
-Clear PVC as a sight level gauge
-8" screw lid on top of SW tub
-Ball valve on riser to add a future hose output
-Float switch in RODI tub
-Heater in SW tub
-Built wooden stand to dispense directly into 5g jugs
Get the one stage single glue….primer is just for home inspections. They have a single stage glue that’s clear.How in the world does one primer pvc without ruining the appearance with those dreadful purple bleeding stains?
Clear PVC primer is available everywhere.How in the world does one primer pvc without ruining the appearance with those dreadful purple bleeding stains?

Thank you. This is huge for me. Honestly I would have destroyed the look.
This is all you need. Less steps and clean look.
")