• Welcome back Guest!

    MARSH is a private reefing group. Comments and suggestions are encouraged, but please keep them positive and constructive. Negative threads, posts, or attacks will be removed from view and reviewed by the staff. Continually disruptive, argumentative, or flagrant rule breakers may be suspended or banned.

UNS 90S Shallow Minimalist Build (1 Viewer)

Users who are viewing this thread

Joined
Sep 8, 2022
Messages
49
Reaction score
45
Location
Seabrook
Hey guys
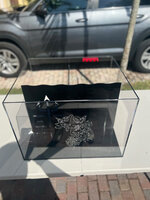
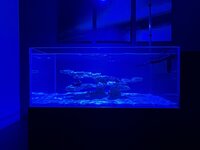
Due to a surprise gift of a UNS 90S (36x22x14) my Fluval Flex 15 was taken down and livestock swapped to a 20H holding stank. Was originally planning on using much of the equipment but decided to go full on.

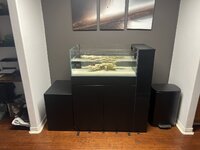
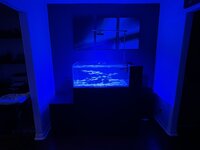
This Tank will again be a minimalist style with a custom Quasi bonsai style centerpiece from Chandler Rocks. Still planning on mostly an anemone tank but maybe some GSP for a splash of color and movement but who knows we are not near that step yet haha.

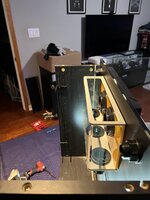
Here is the build sheet as it stands

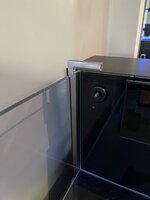
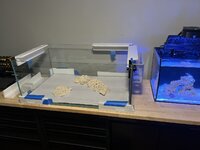
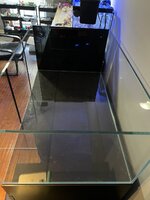
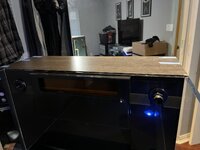
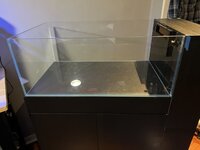
Tank: UNS 90s, Drilled as a Penisula tank
Prodigy large overflow
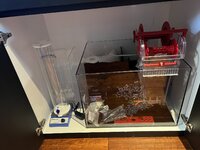
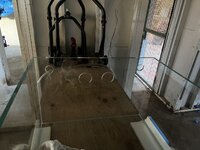
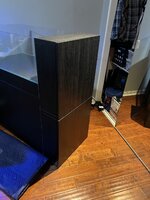
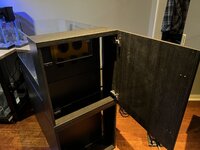
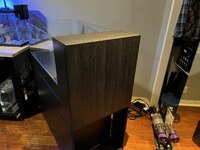
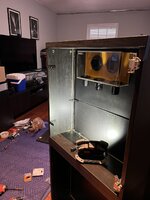
Stand: Custom Fish Bowl modern style
Lighting: X2 AI Prime HD, ONF stainless bar
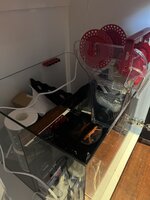
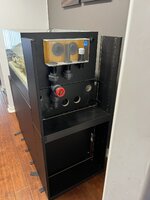
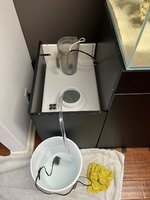
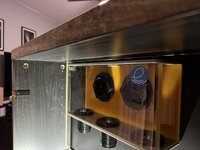
Sump: Custom Poseidon’s Creations 3
chamber built for a ReefMat 500,
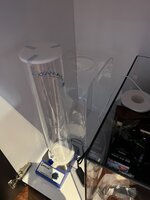
Filtration: Custom External Cheato reactor
(Converted Biorb tank)
Flow: X2 Vortex MP10 with Nemo guards
Aquascape: Chandler Rocks custom
Control: Full Apex classic
Misc: DIY Kalk Reactor,BRS dosing pump

Here’s some pics will update as it is built

Jake
 

Attachments

  • 1B136555-85AB-461B-9BFC-9E857F925070.jpeg
    1B136555-85AB-461B-9BFC-9E857F925070.jpeg
    184.5 KB · Views: 31
  • CD980BF4-5EEB-4AF8-8B8B-233734E16A29.jpeg
    CD980BF4-5EEB-4AF8-8B8B-233734E16A29.jpeg
    319.2 KB · Views: 32
  • A2B45215-FA4E-4DDB-AB3C-B631141AA4FF.jpeg
    A2B45215-FA4E-4DDB-AB3C-B631141AA4FF.jpeg
    167.8 KB · Views: 30
  • 1A977453-8924-4E26-92F3-CB32431EF174.jpeg
    1A977453-8924-4E26-92F3-CB32431EF174.jpeg
    257.8 KB · Views: 32
OP
OP
G
Joined
Sep 8, 2022
Messages
49
Reaction score
45
Location
Seabrook
After trying to place the tank as a true Penisula tank I decided to keep it standard to fit the room. I wanted to keep the stand free of as much electronics as possible so I decided to build an external control panel along with hiding the overflow. Two IKEA cabinets and a bunch of bracing and this is what I came up with.

Bottom will house controls and top will just hide the overflow and return pipes. Both have doors on outside and the top panel
comes off for top down access to the overflow.

Color is off but close enough for me, could always unbolt it paint outside to match the matte black.

If I ever upgrade to a 4 foot tank I’ll have all this build into a custom stand, love how it looks.

Jake
 

Attachments

  • B214E774-4801-4A1A-B9BE-E6D918BC282B.jpeg
    B214E774-4801-4A1A-B9BE-E6D918BC282B.jpeg
    326.1 KB · Views: 35
  • FDFBFEB1-5F93-4F55-B9C6-ECCE68CD8844.jpeg
    FDFBFEB1-5F93-4F55-B9C6-ECCE68CD8844.jpeg
    269.8 KB · Views: 30
  • D977528B-55DA-4268-B55B-FF301FCB26CA.jpeg
    D977528B-55DA-4268-B55B-FF301FCB26CA.jpeg
    290.8 KB · Views: 30
  • F9ED84B3-9BB2-459D-88F6-81A8045EFEBE.jpeg
    F9ED84B3-9BB2-459D-88F6-81A8045EFEBE.jpeg
    267.5 KB · Views: 30
  • 88E73C30-417C-4BFA-B0FB-813E2DF58F1D.jpeg
    88E73C30-417C-4BFA-B0FB-813E2DF58F1D.jpeg
    247.6 KB · Views: 31
  • 247C98AE-646B-46E2-BBC4-C4C1DAF9D395.jpeg
    247C98AE-646B-46E2-BBC4-C4C1DAF9D395.jpeg
    327.2 KB · Views: 29
  • 4188622A-98F2-4B9F-B91F-B309DBF7F9F6.jpeg
    4188622A-98F2-4B9F-B91F-B309DBF7F9F6.jpeg
    214.9 KB · Views: 34
  • 7C713293-BA14-48CC-AB72-4CE1B2CD920E.jpeg
    7C713293-BA14-48CC-AB72-4CE1B2CD920E.jpeg
    172.2 KB · Views: 34
OP
OP
G
Joined
Sep 8, 2022
Messages
49
Reaction score
45
Location
Seabrook
I only wish it was the UNS 120 (48x22x14) true long shallow style but I just won’t fit in my space.

It is a great gift but it’s going take some time to get going as I was looking to upgrade to a 25-30gal display and it kinda doubled haha
 
OP
OP
G
Joined
Sep 8, 2022
Messages
49
Reaction score
45
Location
Seabrook
Got word my sump is done and getting shipped to me, once it’s here I can start plumbing the tank.

Only thing lets ti decided is Bare Bottom, White Acrylic bottom or white bottom painted.

Anyone had any experience with an acrylic bottom ?
 

Attachments

  • 5F28D8DA-264B-4247-9F69-B5394C2467F7.jpeg
    5F28D8DA-264B-4247-9F69-B5394C2467F7.jpeg
    202.8 KB · Views: 16
OP
OP
G
Joined
Sep 8, 2022
Messages
49
Reaction score
45
Location
Seabrook
Got the sump and mocked up the filter area with my extras.

Can’t say enough about the sump excellent work and recommend them to anyone.

Also attached first part of the ONF light bar looks amazing.
 

Attachments

  • 87F96F11-0871-4753-95EB-2B8B3481296B.jpeg
    87F96F11-0871-4753-95EB-2B8B3481296B.jpeg
    290.2 KB · Views: 21
  • 9632453E-6B05-43C9-81EC-6656E247F2FC.jpeg
    9632453E-6B05-43C9-81EC-6656E247F2FC.jpeg
    204.9 KB · Views: 21
  • B082FB29-2291-46D7-A7C9-248C55678C9B.jpeg
    B082FB29-2291-46D7-A7C9-248C55678C9B.jpeg
    248.9 KB · Views: 20
  • 0E6E7416-D60C-471C-842F-88AD0EC94777.jpeg
    0E6E7416-D60C-471C-842F-88AD0EC94777.jpeg
    143.4 KB · Views: 21
OP
OP
G
Joined
Sep 8, 2022
Messages
49
Reaction score
45
Location
Seabrook
Season started at the shop in Galveston so I’m going be working on it when we have rain days from here on out. Got the temp tank all ready and automated so it’s going be slow build on the large tank from here on out.

Big things to figure out
Bare bottom vs PVC bottom vs painted bottom vs super shallow sand (1/4 deep)

From there I need to build the Fuge and order a return pump and skimmer and plumb it all together
 
OP
OP
G
Joined
Sep 8, 2022
Messages
49
Reaction score
45
Location
Seabrook
Small update
IMG_2156.jpeg


Can’t be more excited with how the scape came out. Was way more affordable than by other options including buying shelf rock myself and building it. Highly recommended, He even sent pics and phone calls during the build to change things as he built it to suit what I was looking for.
 
OP
OP
G
Joined
Sep 8, 2022
Messages
49
Reaction score
45
Location
Seabrook
Lil update
Moved the tank to a better location in the house. Finished up the ATO container cabinet for the left side of the tank.

Decided on sand instead of bare or plastic bottom. Special Grade sand going to be very shallow like 1/4-1/2 deep. Extra sand is in the tank to cycle then will be moved to 15G tank.

Moved the scape into the tank, Half was curing downstairs in a black bin other half was in a temp tank. Filled the tank up about 20 gallons and will cycle fish less for next few months inside while I finish plumbing and all the extra odds and ends. As I finish that I’ll fill it up fully.

At least I will have something to look at while it cycles and becomes a more stable tank.

Brought a small purple rock from existing tank to help seed biome along with the live sand and bacter 7 and turbo start. I will be adding ammonia until I run out then add food and shrimp to keep a food source in tank. Eventually move clowns over. Going give the tank a good 6+ months before trying any Nems.


IMG_2893.jpeg
IMG_2894.jpeg IMG_2895.jpeg
 

Attachments

  • IMG_2895.jpeg
    IMG_2895.jpeg
    217.2 KB · Views: 3
OP
OP
G
Joined
Sep 8, 2022
Messages
49
Reaction score
45
Location
Seabrook
Small update
Got half the plumbing done but ran out of fittings so waiting on BRS to ship more. I got the Reefmat setup and all holes for plumbing finished.

Few things left before I can fully fill the tank.

Need to seal the holes in the side of the tank. Waiting for two simplicity1000 pumps so I can figure out return lines. Going with two return pumps and will have separate return lines, one with a manifold. Need to build out the two outflow manifold.

Once I get that done install my titanium heaters installed and then it’s time to keep cycling. Thinking about a month fishless, then add my clowns.


IMG_2926.jpeg


IMG_2926.jpeg
 

Attachments

  • IMG_2917.jpeg
    IMG_2917.jpeg
    234.9 KB · Views: 5
OP
OP
G
Joined
Sep 8, 2022
Messages
49
Reaction score
45
Location
Seabrook
Update.

Got the tank plumbed and fully filled. Dual Pumps are way stronger than expected but this may end up being a blessing. May not need to run any Powerheads for the Nems. Added one of the two lights to give it some light during this long cycle.

Running minimal gear in the tank for the time being and am thinking of running it like this till prob end of summer give it lots of time to cycle before moving Nems over.

Still need to build the external Fuge. Thinking of adding small skimmer to run Ozone. I’ll be adding all the gear and then tackling the wiring and Apex setup but I can take my time getting it all set up.
 

Attachments

  • IMG_3249.jpeg
    IMG_3249.jpeg
    84.1 KB · Views: 7
  • IMG_3250.jpeg
    IMG_3250.jpeg
    112.7 KB · Views: 7
  • IMG_3247.jpeg
    IMG_3247.jpeg
    243.3 KB · Views: 7

frankc

Supporting Member
Member Spotlight Contest Winner
Build Thread Contributor
Joined
Jun 11, 2012
Messages
1,360
Reaction score
1,330
Location
The Woodlands
Based on that last picture, it looks like you will always be fishless. lol

You should be fine without powerheads for nems. I have nothing but the return flow in my 150, and the nems thrive and multiply like crazy. It's great not having to worry about them getting sucked into powerheads.
 
OP
OP
G
Joined
Sep 8, 2022
Messages
49
Reaction score
45
Location
Seabrook
Tank update.

Amazing how much slower this build
Is taking compared to working on larger tanks 15 years ago.

Added a 16g ATO container instead of the 10 gal tank. Built out the manifold for the external Fuge.

Glued drilled and plumbed the Fuge. I’m just waiting for a 1/2 endcap that got lost in the mail to finish off the rotating cheato Fuge. Going try and use my old Fuge light but have a feeling I’ll want to upgrade to use the Fuge to out compete algae in the display.

Built an acrylic sump lid but have to redo it once I mount the Fuge. Also thinking I’m going need to have some vent holes and also vent out the cabinet. The lid bends after a day above the sump.

Finished up the light bar and light schedule, just need to add the second AI Prime.

Enjoy some pics.

IMG_3648.jpeg

IMG_3650.jpeg

IMG_3693.jpeg


IMG_3761.png
 

Attachments

  • IMG_3746.jpeg
    IMG_3746.jpeg
    288.7 KB · Views: 1
Top