• Welcome back Guest!

    MARSH is a private reefing group. Comments and suggestions are encouraged, but please keep them positive and constructive. Negative threads, posts, or attacks will be removed from view and reviewed by the staff. Continually disruptive, argumentative, or flagrant rule breakers may be suspended or banned.

Builder building the build (1 Viewer)

Users who are viewing this thread

OP
OP
decimal

decimal

Supporting Member
Build Thread Contributor
Joined
Apr 20, 2007
Messages
2,515
Reaction score
1,133
Location
humble
Don’t get exited. Here, let me help explain… In German nipples are called “brustwarzen” or literally translated as breast warts. So that should take care of that. You’re welcome.

Also… it really was an oversight. Thank god I’m wearing pants.
 

Erin

Supporting Member
Member Spotlight Contest Winner
Joined
Sep 16, 2016
Messages
1,362
Reaction score
836
Location
Spring, Texas
I believe the general consensus is not to mix bacterial additives.

Each product could be a different strain and they could end up competing with each other and perhaps slowing down your insta cycle.
Interesting. I have not heard that hypothesis before.
 
OP
OP
decimal

decimal

Supporting Member
Build Thread Contributor
Joined
Apr 20, 2007
Messages
2,515
Reaction score
1,133
Location
humble
I first became aware of that biological interaction after it was explained to me by the guy who owns brightwell. He was all up in arms about Carib sea and their live sand. He explained some of the issues with live sand and the bacterial strains having relatively poor performance but outcompeting higher performing, more efficient strains. So that is the reason to start with dry sand and rock, add a solid quick cycle system that allows designed high efficient bacteria strains to establish itself. If you use more than one system, you might be introducing competing strains increasing the time it takes for one strain to become dominant and established. I’m not sure if Fritz even has specific bacterial strains or if it’s just fish poo on steroids lol.
 
OP
OP
decimal

decimal

Supporting Member
Build Thread Contributor
Joined
Apr 20, 2007
Messages
2,515
Reaction score
1,133
Location
humble
Moving forward

EEF23D18-A496-4203-918A-587F7BD32456.jpeg

80243A92-300C-46A7-AEAD-A1C787847031.jpeg

I’m still waiting on a few parts but hopefull should be fully hooked up by the end of the week or the end of next week.. or the week after that 🙄
 
OP
OP
decimal

decimal

Supporting Member
Build Thread Contributor
Joined
Apr 20, 2007
Messages
2,515
Reaction score
1,133
Location
humble
Can’t have too much flow. More stuff happening today..

40380ED8-0A71-45C2-9919-761430680143.jpeg
17874688-DE92-4C41-9A78-7DD68FF33733.jpeg

Just gotta finish hooking up the calcium Rx..
then I will finally test the water to see where I’m at. Should be good enough for a couple of clowns.
 
OP
OP
decimal

decimal

Supporting Member
Build Thread Contributor
Joined
Apr 20, 2007
Messages
2,515
Reaction score
1,133
Location
humble
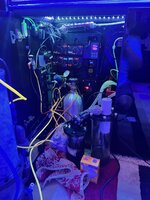
Making some progress..
got the board finally wired up so I can hang it.

391A04E4-8554-430E-8F24-63EFBAA37A5A.jpeg

The sump looks good from over here. I moved that whole ozone reactor in the sump. It was noisy and taking up a lot of room.

B6E0171C-243F-48DC-9145-F55CB59B2804.jpeg
 
OP
OP
decimal

decimal

Supporting Member
Build Thread Contributor
Joined
Apr 20, 2007
Messages
2,515
Reaction score
1,133
Location
humble
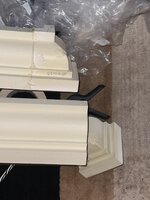
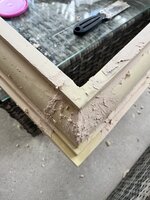
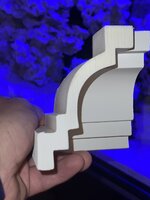
I have a 60” aquatic life T5 fixture and 3 RS Reefled 90 in the center. The way everything sits, it casts off a ton of glare and spillage. I was searching for a lightweight and easy to work with material for a light skirt. After some back and forth, I decided on polyurethane(?) crown molding.
The profile looked like this..
BB605BD0-49BA-40CD-A911-30394A3D244D.jpeg BBC2F05A-747D-475F-8BF4-051F412B5D86.jpeg

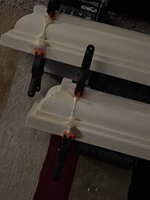
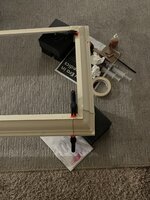
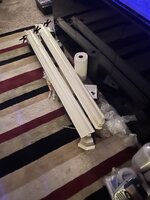
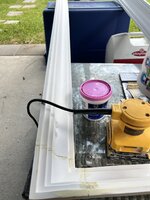
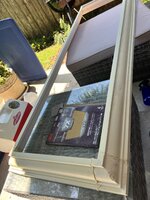
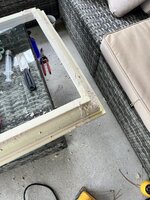
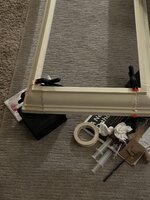
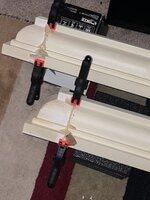
The whole frame slides on the aquatic life fixture and sits on the first ledge from the top. I do not have a miter box saw so I just bought the preformed corners and glued the straights.

4B435B80-1438-4EC6-AD61-4CA9BC2AAE73.jpeg 4E73E01E-AF39-4ED2-9456-C4B5AD1202CA.jpeg CA3D8E49-D2A4-4047-8CEA-06DA51774072.jpeg BEC03E93-25DB-4B07-9401-FEF21BAEF65C.jpeg 57F096F1-C8FB-4250-A84D-7D215B9429AE.jpeg 3B5CFA5D-90E5-4A49-A723-711ADB20A231.jpeg

I taped up the joints from the inside (underside) with masking tape and used original gorilla glue. The process is to wet the surface and then apply the glue. I was able to use syringes for both parts, squirted water in the joints and filled them with gorilla glue. The glue expands and foams into an easy to work with material that can be sanded and painted. Once the initial frame is glued together and sanded down, fill all remaining imperfections with joint compound. Sand once more and spray paint.
 
Last edited:

Erin

Supporting Member
Member Spotlight Contest Winner
Joined
Sep 16, 2016
Messages
1,362
Reaction score
836
Location
Spring, Texas
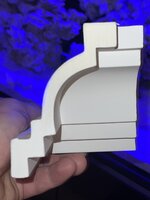
I have a 60” aquatic life T5 fixture and 3 RS Reefled 90 in the center. The way everything sits, it casts off a ton of glare and spillage. I was searching for a lightweight and easy to work with material for a light skirt. After some back and forth, I decided on polyurethane(?) crown molding.
The profile looked like this..
BB605BD0-49BA-40CD-A911-30394A3D244D.jpeg BBC2F05A-747D-475F-8BF4-051F412B5D86.jpeg

The whole frame slides on the aquatic life fixture and sits on the first ledge from the top. I do not have a miter box saw so I just bought the preformed corners and glued the straights.
4B435B80-1438-4EC6-AD61-4CA9BC2AAE73.jpeg 4E73E01E-AF39-4ED2-9456-C4B5AD1202CA.jpeg CA3D8E49-D2A4-4047-8CEA-06DA51774072.jpeg BEC03E93-25DB-4B07-9401-FEF21BAEF65C.jpeg 57F096F1-C8FB-4250-A84D-7D215B9429AE.jpeg 3B5CFA5D-90E5-4A49-A723-711ADB20A231.jpeg

I taped up the joints from the inside (underside) with masking tape and used original gorilla glue. The process is to wet the surface and then apply the glue. I was able to use syringes for both parts, squirted water in the joints and filled them with gorilla glue. The glue expands and foams into an easy to work with material that can be sanded and painted. Once the initial frame is glued together and sanded down, fill all remaining imperfections with joint compound. Sand once more and spray paint.
I love this idea!
 
OP
OP
decimal

decimal

Supporting Member
Build Thread Contributor
Joined
Apr 20, 2007
Messages
2,515
Reaction score
1,133
Location
humble
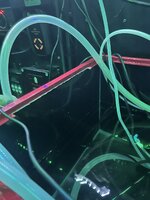
Still working on that hood, but everything is coming along. I have some diatoms popping up here and there so I am preparing my self for the “ugly” phase. The controller I am building over in this thread is also coming along but it’s a process. Some updated pics..

A8A86701-FFDA-4B81-BA61-50975147FBEF.jpeg C5F23CCA-4C9A-44F1-8027-202BBFF7C612.jpeg
 
Last edited:
OP
OP
decimal

decimal

Supporting Member
Build Thread Contributor
Joined
Apr 20, 2007
Messages
2,515
Reaction score
1,133
Location
humble
More progress on the that light hood

4962D81C-3558-4EFF-A5CF-4FADA4F60E96.jpeg 7763C3FE-868B-4FB1-8A81-38128ECFEDAB.jpeg E5D69296-CDCB-4684-B4A6-93EEF360C62C.jpeg 790CA246-C4F6-4344-9C06-5CD78BAA1E5F.jpeg


A couple of side notes for those that want to do this project… first of all, don’t be a cheap ********* like me and buy a damn miter saw. That way, your cuts will be straight, you reduce your connection seams to 4 instead of 8 and it will generally be more square and make things a lot easier..

All of the crown molding profiles are going to have a concave design to flow ceiling to wall. In our case, we want the convex profile which means the finished side is going to be the inside of our hood. The other side no one sees and therefore is rough. Get ready to fill and sand. Actually, any project that requires painting, will require sanding especially if you want a nice end result.
 
Last edited:
OP
OP
decimal

decimal

Supporting Member
Build Thread Contributor
Joined
Apr 20, 2007
Messages
2,515
Reaction score
1,133
Location
humble
So the whole ich thing happened and left me in a sort of spot. I don’t have qt stuff and everyone a showing signs. I am sort of stepping back a little and watching it play out. I will need to intervene at one point or another but at least I hopefully will have some time.

I have ozone running and as a way of tiling the scales a little in the fishes favor, I added a new lifeguard 40w pro UV. As luck would have it, the combination of Ozone water and UV creates sanitizing radicals. It is the accepted way to treat and sanitize waste water or any water in general including SW tanks. My hope is that not only will It help with algae, it will also keep free floating parasites from multiplying. Ich, after letting go of the fish, moves along the substrate floor to find a place to settle, morph and reproduce. So that would be the reason for filtering the DT instead of the sump.
 
OP
OP
decimal

decimal

Supporting Member
Build Thread Contributor
Joined
Apr 20, 2007
Messages
2,515
Reaction score
1,133
Location
humble
So a couple of things have happened. The Ich ran its course and took the flame angel and the Achilles tang. Everyone else has recovered nicely and doing well. I had managed to move the UV behind the tank and after a long battle, it finally fit. I had run the feed and return lines over the edge of the tank because I hoped taking water from the bottom of the tank itself would be most effective since ich has a developmental stage where it spends time on the substrate and bottom of the tank looking for a place to settle.

AE5512DE-8F00-4F4D-AE95-774348FD390F.jpeg

This was an acceptable, albeit temporary, solution. Somewhere during the move from front of the tank to back of the tank, it started to occasionally suck air from one of the connections and I would get bubbles everywhere in the tank. So.. not a solution. I had to tear everything out again and redo the connections.

After another long battle getting that damn thing out and checking everything, the bubbles went away but I did not bother placing the UV in the back of the tank because I was going to reroute to the sump anyways.
 
OP
OP
decimal

decimal

Supporting Member
Build Thread Contributor
Joined
Apr 20, 2007
Messages
2,515
Reaction score
1,133
Location
humble
While this was all going on, I was plagued by inconsistencies from the tank return system. I would dial everything in and it would be alright for a few days but as the socks got dirty and filled up, the water level kept changing causing ATO to kick in and “overfill” (not flood but enough to stop the weir from overflow to stop working properly. So I was constantly having the clean socks and messing with the gate valve and return rate. This had been going on for months and I had picked up a Reefmat 1200 a few weeks ago that has been sitting in my garage waiting to be installed. Before that happened though, I had to get a few things squared away to make room in the sump.

After adding the UV, the water along with the ozone turned incredibly clear. So that was great. Over the next few weeks however, the water became saturated with ever present large particles suspended in the water column. The socks sucked and my frustration was increasing every day.
 
OP
OP
decimal

decimal

Supporting Member
Build Thread Contributor
Joined
Apr 20, 2007
Messages
2,515
Reaction score
1,133
Location
humble
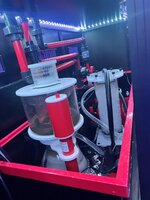
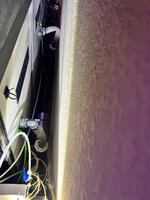
So.. here is how it went.. I finally pulled the entire UV assemble out and relocated the feed pump to the sump. With out the heavy feed pump attached to the UV body, it became much easier to manage. Not easy, but easier lol. The second stage was to pull the Ca2 Rx from its spot underneath the tank and relocate it to a better spot. The way it was sitting was blocking access to the entire control panel and also taking up so much room the Reefmat would not have fit.

112951E6-28B7-4FAC-ADCF-4C15B9E99689.jpeg

I purchased an additional nano cabinet (already had one that houses controller, dosing pumps and Kalk Rx.) so now I have 2. Once I pulled the Ca2 setup, I had plenty of room in the sump to drop in the Reefmat. Install was not too hard even though I had to modify the rim of the sump so it would sit properly.

919D857F-650C-44BE-8016-EA31832541EE.jpeg

6655A803-5D16-4DA4-AFEB-E7EE41E8CB5B.jpeg

I hooked it up and was promptly confronted with the fact that without a gate valve this was a no go.


The gate valve part of the install was a long road though. The drain line on the tank was metric and I had to source parts from neptunian which took a long time and was not easy (Far away). The valves I had did not fit properly, everything was complicated and the pipe did was too small for a 1” fit (did not fit properly into a 1” slip fitting) but too big for 3/4” it was really kind of distributing and traumatizing after spending so much time getting everything ready and all the effort only to be thwarted by improper fit. Good luck trying to source a metric gate valve, comparable reducers or whatever it takes to get that Reefmat running.

I finally was able to slip a 1” silicone tube over the pipe, use a 1” barbed to threaded fitting screwed into a 1” threaded gate valve and that sort of worked ( I checked and it’s not water tight so I’m going to have to reset all the connections.)

2C654639-2A57-4C7E-A498-DE18ABE0599B.jpeg
 
Last edited:
OP
OP
decimal

decimal

Supporting Member
Build Thread Contributor
Joined
Apr 20, 2007
Messages
2,515
Reaction score
1,133
Location
humble
Everything is silent now. The Reefmat is an amazing piece of hardware and it was worth all the trouble getting everything ready. The water cleared up in a matter of a few hours, the water level is consistent and I do not have to revisit the water level all the time. All I can say is goodbye socks and good riddance.
 
Top