• Welcome back Guest!

    MARSH is a private reefing group. Comments and suggestions are encouraged, but please keep them positive and constructive. Negative threads, posts, or attacks will be removed from view and reviewed by the staff. Continually disruptive, argumentative, or flagrant rule breakers may be suspended or banned.

So I'm Building Stuff Again. 150g Plus Fish Room. (1 Viewer)

Users who are viewing this thread

OP
OP
Cody

Cody

Vice President
Staff member
Administrator
Moderator
Content Moderator
Board Member
Supporting Member
Joined
Jul 23, 2014
Messages
7,329
Reaction score
4,270
Location
Spring, TX
Here's a little pic to add color from my frag rack to prove corals are actually in these tanks haha! I haven't taken coral pics in a while.

Photo Sep 12 2023, 6 01 43 PM.jpg
 
OP
OP
Cody

Cody

Vice President
Staff member
Administrator
Moderator
Content Moderator
Board Member
Supporting Member
Joined
Jul 23, 2014
Messages
7,329
Reaction score
4,270
Location
Spring, TX
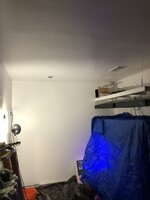
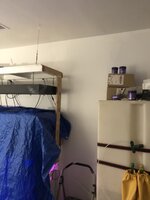
Finally finishing the drywall front and moving on to painting. The shadows in the pic don't do the work justice. There are definitely line shadows, but 95% of them aren't from the repairs I did. It was originally garage drywall that's 25 years old and had major imperfections. Plus, no texture, so it is what it is.

Photo Oct 08 2023, 1 29 12 AM.jpg

Photo Oct 08 2023, 1 29 34 AM.jpg
 
OP
OP
Cody

Cody

Vice President
Staff member
Administrator
Moderator
Content Moderator
Board Member
Supporting Member
Joined
Jul 23, 2014
Messages
7,329
Reaction score
4,270
Location
Spring, TX
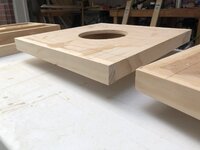
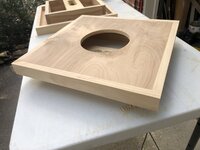
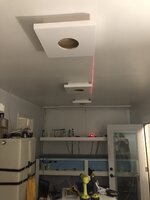
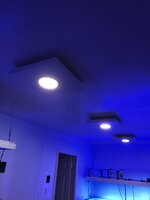
For the new ceiling lights, I decided not to put the recessed lights directly into the ceiling. I liked the idea of a large hanging canopy just to light the room, but the ceilings aren't super tall. Also, I liked the idea of having a backlit light system with physical water flowing over the lights to cast shimmer on the roof, but it would be too impractical on a week in, week out basis. So, the compromise was just backlit pendants that will act as moon lights for the entire room.

Photo Oct 07 2023, 5 58 50 PM.jpg

Photo Oct 07 2023, 4 20 28 PM.jpg


Photo Oct 08 2023, 10 28 33 PM.jpg


Photo Oct 11 2023, 3 07 07 PM.jpg


There has been a back and forth between purchases and returns with Amazon the past couple weeks but the right LED strips should be here today to backlight these pendants for the room moon light today. I more or less got this build up to thread pretty quickly. Lot's of trial and error along the way, and haven't talked about the display tank yet, but those details are to come.
 
Last edited:

gregg

President
Staff member
Administrator
Moderator
Board Member
Supporting Member
Build Thread Contributor
Joined
Jan 28, 2015
Messages
6,839
Reaction score
2,843
Location
Downtown
For the new ceiling lights, I decided not to put the recessed lights directly into the ceiling. I liked the idea of a large hanging canopy just to light the room, but the ceilings aren't super tall. Also, I liked the idea of having a backlit light system with physical water flowing over the lights to cast shimmer on the roof, but it would be too impractical on a week in, week out basis. So, the compromise was just backlit pendants that will act as moon lights for the entire room.

Photo Oct 07 2023, 5 58 50 PM.jpg

Photo Oct 07 2023, 4 20 28 PM.jpg


Photo Oct 08 2023, 10 28 33 PM.jpg


Photo Oct 11 2023, 3 07 07 PM.jpg


There has been a back and forth between purchases and returns with Amazon the past couple weeks but the right LED strips should be here today to backlight these pendants for the room moon light today. I more or less got this build up to thread pretty quickly. Lot's of trial and error along the way, and haven't talked about the display tank yet, but those details are to come.
these look cool.
 
OP
OP
Cody

Cody

Vice President
Staff member
Administrator
Moderator
Content Moderator
Board Member
Supporting Member
Joined
Jul 23, 2014
Messages
7,329
Reaction score
4,270
Location
Spring, TX
OP
OP
Cody

Cody

Vice President
Staff member
Administrator
Moderator
Content Moderator
Board Member
Supporting Member
Joined
Jul 23, 2014
Messages
7,329
Reaction score
4,270
Location
Spring, TX
Nice setup, I wish I could redo my room but that's the last thing I need to do on my list right now haha.
Yeah it’s a big project for sure. Had it been a new construction then it would have gone much faster. If I had to do it again then I would have sold pretty much all of my corals, done the build fast, then just buy new stuff. Lesson learned.
 

Bigfishy

Supporting Member
Joined
Mar 7, 2014
Messages
598
Reaction score
136
Got everything positioned, holes drilled, cracks filled with wood filler, and hung to test. The system will use three TDS meters (dual, dual, and triple) and they will be positioned under the top three canisters. I’m done sanding and ready to take everything off and paint! All the tubes go back into the fac wall and will be hidden inside the cabinet for a nice, clean look. I even installed the psi meter to the right of the booster pump!
87D2D7FE-5A61-47DE-8944-F34D46F9B887.jpeg


A sneak peak of what I’m doing with the leds on it too…

59C13071-890F-49E5-8702-F931A1B1C9D4.jpeg

Got the final canister in the mail tonight.

38762407-7952-4400-88D8-DC1078C3DFD7.jpeg


Painting white to match the room and walls.

E22C9B4D-8106-48C2-94E7-B088EEB42A44.jpeg

3073D6DA-004D-4A99-AA3D-8DBD26896E66.jpeg
Hey Cody, what are the dimensions? Is there anything that you would change and how close is each canister to one another?
 
OP
OP
Cody

Cody

Vice President
Staff member
Administrator
Moderator
Content Moderator
Board Member
Supporting Member
Joined
Jul 23, 2014
Messages
7,329
Reaction score
4,270
Location
Spring, TX
Hey Cody, what are the dimensions? Is there anything that you would change and how close is each canister to one another?
The cannisters are mounted about 6.5" on center apart from each other. The overall dimensions are 2'x4'. The thing that I would change is to add a barrier above the meters. I learned early to remove/protect them before you start opening cannisters above them after water ruined a couple of them. I just haven't gone back in and added a 1x2 above them to shield from the splashes. If water gets on the face of the meters then it's no problem. Issues come up when water hits them directly from the top, which is where the electronic connections are.

You looking to build one of these?
 

Bigfishy

Supporting Member
Joined
Mar 7, 2014
Messages
598
Reaction score
136
The cannisters are mounted about 6.5" on center apart from each other. The overall dimensions are 2'x4'. The thing that I would change is to add a barrier above the meters. I learned early to remove/protect them before you start opening cannisters above them after water ruined a couple of them. I just haven't gone back in and added a 1x2 above them to shield from the splashes. If water gets on the face of the meters then it's no problem. Issues come up when water hits them directly from the top, which is where the electronic connections are.

You looking to build one of these?
Ah, that makes total sense with the meters, thanks! I need to take some pictures. I have built one this past weekend that is 3x5’7’’. Not quite finished yet. Still need to mount the meters. Missing one bracket and a couple of fittings for one of the RO housing. Doing three RO in series.
 
OP
OP
Cody

Cody

Vice President
Staff member
Administrator
Moderator
Content Moderator
Board Member
Supporting Member
Joined
Jul 23, 2014
Messages
7,329
Reaction score
4,270
Location
Spring, TX
Ah, that makes total sense with the meters, thanks! I need to take some pictures. I have built one this past weekend that is 3x5’7’’. Not quite finished yet. Still need to mount the meters. Missing one bracket and a couple of fittings for one of the RO housing. Doing three RO in series.
Post some pics when you take them. That would help me give you some pointers, for sure!
 

Bigfishy

Supporting Member
Joined
Mar 7, 2014
Messages
598
Reaction score
136
Post some pics when you take them. That would help me give you some pointers, for sure!
I keep forgetting to post these pics and take some better pics. My Booster pump seems to have gone out.
 

Attachments

  • IMG_0041.jpeg
    IMG_0041.jpeg
    404.2 KB · Views: 5
  • IMG_0040.jpeg
    IMG_0040.jpeg
    402.5 KB · Views: 5
OP
OP
Cody

Cody

Vice President
Staff member
Administrator
Moderator
Content Moderator
Board Member
Supporting Member
Joined
Jul 23, 2014
Messages
7,329
Reaction score
4,270
Location
Spring, TX
I keep forgetting to post these pics and take some better pics. My Booster pump seems to have gone out.
Dang, that's a lot of stages! Have you done extended time trials to see how many GPD you're making in real time? I think I clocked mine in at about 350 GPD based off of how long it took to roughly fill my 150 and 75 gallon vats. They both feed off the same RO/DI unit that splits in the attic and then drops down to each, which are controlled by valves.
 

Bigfishy

Supporting Member
Joined
Mar 7, 2014
Messages
598
Reaction score
136
Dang, that's a lot of stages! Have you done extended time trials to see how many GPD you're making in real time? I think I clocked mine in at about 350 GPD based off of how long it took to roughly fill my 150 and 75 gallon vats. They both feed off the same RO/DI unit that splits in the attic and then drops down to each, which are controlled by valves.
I plan to check my GPD once I get my booster pump replaced. My plan is to see how long it takes to fill a 5 gallon bucket and then divide 24 hours by the time it took and them multiple by 5 to get the GPD.
 
Top