• Welcome back Guest!

    MARSH is a private reefing group. Comments and suggestions are encouraged, but please keep them positive and constructive. Negative threads, posts, or attacks will be removed from view and reviewed by the staff. Continually disruptive, argumentative, or flagrant rule breakers may be suspended or banned.

Sergio Nuncio 271 custom 3 side starphire, coast 2 coast (1 Viewer)

Users who are viewing this thread

OP
OP
sergio nuncio
Joined
Jan 28, 2012
Messages
969
Reaction score
0
Location
Katy, Texas, United States
wow. this build thread is plain beautiful. nice stuff going in to this tank.
Thanks TOEFU - I'm thinking about making some changes.. The area I have the tank, Is a bit tight. I'm thinking of setting the tank into the wall about 6" to 8" or so. I'm not sure if its possible. This should open the area up a little and give me more space.. Still thinking. I'll post a few pictures of the location shortly..

Thanks for your positive comment !!
 
OP
OP
sergio nuncio
Joined
Jan 28, 2012
Messages
969
Reaction score
0
Location
Katy, Texas, United States
Here are a few pictures of the area my new tank will sit... The space isn't very large so, I'm thinking of setting the tank in the wall about 6" to 8"... I'm not sure if this is possible but were working on it. The wall may be a "load" wall, not sure.... any ideas would be awesome.....

IMG_5353.jpg IMG_5355.jpg IMG_5357.jpg IMG_5359.jpg IMG_5362.jpg
 

Mark L.

Moved On
Joined
Oct 8, 2010
Messages
7,532
Reaction score
0
Location
The Woodlands
Looking good man! I like that sump. Kinda wish I would have done my filter socks like that but oh well. If I change my design every time I see something different I like mine will never get finished! LOL
 

d2mini

Guest
Joined
Sep 9, 2008
Messages
3,336
Reaction score
24
Location
Houston
If I change my design every time I see something different I like mine will never get finished! LOL


EXACTLY!
It's all mental notes for the next build. :biggrin1:

Because there will always be a next build. :thumb:
 

inigomontoya

1
Supporting Member
Joined
Sep 6, 2010
Messages
1,795
Reaction score
7
Location
NW Side Jones/West
Looking good, also love the custom sumps. I have a stupid question about the filter socks, my sump has the add on filter sock holder which is 3/4 of a circle. So I simply lift my flex pvc drains out then turn the filter sock a little and slide out. For those with full circles and the solid pipe running into it with the sump- how are you changing these? Looks like it would be awkward.

Sergio- also see what you mean about the few inches into the wall helping, the equivalent of the bookshelves on the side would be nice. Looks like it may be unlikely with the walkway directly above though as far as load bearing walls. Possibly something as simple as moving the chair in some and putting the large plate on other side of that table (or sliding table) will help at least. Don't ever regret getting that extra depth though, one thing I wish I had on mine.
 
OP
OP
sergio nuncio
Joined
Jan 28, 2012
Messages
969
Reaction score
0
Location
Katy, Texas, United States
inigmontoya - I'll take a better picture so you can see how it works.... But there is a lid that comes off, then you just reach in and pull it out, No plumbing in the way.... If the wall is load bearing then I may just put a bulk head in that will take the place of the studs...

your thoughts?
 
Joined
May 19, 2008
Messages
2,186
Reaction score
195
Location
Houston
You could do that, but I'd have a pro come look at it and do it. I'm sure it can be done... But, yeah... Upon initial glance, it looks load bearing.

I really love the layout of your digs, bro. ;) Looks very similar to my Texas Den. :D
 
OP
OP
sergio nuncio
Joined
Jan 28, 2012
Messages
969
Reaction score
0
Location
Katy, Texas, United States
You could do that, but I'd have a pro come look at it and do it. I'm sure it can be done... But, yeah... Upon initial glance, it looks load bearing.

I really love the layout of your digs, bro. ;) Looks very similar to my Texas Den. :D
Thanks flipside - i'm gonna have a guy give me his 2-cents in a day or 2..... Time to tile the closet first !!
 

inigomontoya

1
Supporting Member
Joined
Sep 6, 2010
Messages
1,795
Reaction score
7
Location
NW Side Jones/West
Looking at the pictures again, yours makes good sense to me. More so than the typical PM design which is the ones that look so awkward to move the filter socks and pipes. It looks like the drain from the DT goes into the holes on the side of the sump next to the filter socks and then the socks are part of a "mini overflow" type setup with the teeth having overflow from the rest of the sump. If I see this right, it looks like you keep that sump as full as a DT? Nice way to get full utilization out of it if you have your main tank overflows set up so that you don't get too much water drain when the pumps are off.
I am not terribly knowledgeable on the walls, just a DIY'er but yeah sounds like the primary drawback to rearranging the load is $$$.
 
OP
OP
sergio nuncio
Joined
Jan 28, 2012
Messages
969
Reaction score
0
Location
Katy, Texas, United States
Looking at the pictures again, yours makes good sense to me. More so than the typical PM design which is the ones that look so awkward to move the filter socks and pipes. It looks like the drain from the DT goes into the holes on the side of the sump next to the filter socks and then the socks are part of a "mini overflow" type setup with the teeth having overflow from the rest of the sump. If I see this right, it looks like you keep that sump as full as a DT? Nice way to get full utilization out of it if you have your main tank overflows set up so that you don't get too much water drain when the pumps are off.
I am not terribly knowledgeable on the walls, just a DIY'er but yeah sounds like the primary drawback to rearranging the load is $$$.

Yes - your correct on all ends...... asss load of $$ is it, nice thing is, i've learned "IT AINT GONNA HAPPEN OVERNIGHT".....
 

jhill9

Guest
Joined
Dec 25, 2012
Messages
656
Reaction score
0
Location
Bellaire Area
I am 99% sure that is a load bearing wall. But just because it is doesn't mean you can't open it up just as easily. I renovate houses and open up load bearing walls all the time. As long as the beam you install is strong enough there is nothing to worry about. If you want I can send you the span table the Houston permit office uses so you can get an idea what it would take.

From looking at the pictures more space would be nice but you are only going to get 4" depending on 2x4 walls unless you want to move it into the closet some. Only one day project to open up the wall.
 
OP
OP
sergio nuncio
Joined
Jan 28, 2012
Messages
969
Reaction score
0
Location
Katy, Texas, United States
I am 99% sure that is a load bearing wall. But just because it is doesn't mean you can't open it up just as easily. I renovate houses and open up load bearing walls all the time. As long as the beam you install is strong enough there is nothing to worry about. If you want I can send you the span table the Houston permit office uses so you can get an idea what it would take.

From looking at the pictures more space would be nice but you are only going to get 4" depending on 2x4 walls unless you want to move it into the closet some. Only one day project to open up the wall.

jhill9 - That span table would be great, doesn't mean i'll completely understand it but, do send it..... I'm looking to go in the wall about 8-10" and finish out the wall so it flows better with my hallway and living room...

Thanks for your heads up...

Best - Sergio
 

jhill9

Guest
Joined
Dec 25, 2012
Messages
656
Reaction score
0
Location
Bellaire Area
jhill9 - That span table would be great, doesn't mean i'll completely understand it but, do send it..... I'm looking to go in the wall about 8-10" and finish out the wall so it flows better with my hallway and living room...

Thanks for your heads up...

Best - Sergio

Here you go. Looks like you should be around 7-8 foot span with 2 2x12s. If you need more than that you can get an engineered beam.

http://napasolanoicc.org/Links/IBCSpanTables_NapaSolanChapterFinal.pdf
 
OP
OP
sergio nuncio
Joined
Jan 28, 2012
Messages
969
Reaction score
0
Location
Katy, Texas, United States
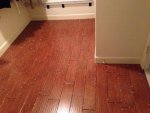
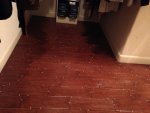
Ok, So the floors are done..... I went with a wood looking tile from Lowes Hardware - I used about 150 Sq ft...

I have to say I'm really happy with the results.. This is my master bedroom closet and My 271G backs up to the coset perfectly..

I used a fellow by the name of "Tino" awesome work, His company name is European-tileworks.com IMG_5425.jpg IMG_5428.jpg
 

Diesel

Moved On
Joined
Oct 16, 2011
Messages
4,146
Reaction score
1
Good work brother!
But becareful with that, next thing you know you got woodtile termites. :crazy:
 
Top